
Microsoft is continuously following its trend to launch a new version of Windows after every 3 years. In the year 2007, they launched Windows 7 and then in the year 2012, they launched Windows 8. Now they are all set to launch Windows 10 in the year 2015. Recently they have launched Windows 10 Technical Preview Enterprise version so that users can test it.
Microsoft has already ended the support for its most loved Operating System which was Windows XP and there was a need for another Windows as Vista was not appreciated that much neither Windows 8. It was the perfect time for them to announce a new version and they launched Windows 10. Rumors were there that it would be Windows 9 but because of a technical glitch or internal issues they named their new product as Windows 10 instead of Windows 9 to avoid the confusion of 9X era.
No one knows the reality of naming it as version 10 but the logic can be understood a bit. If you will give a glance to the categories section on this blog then you might notice that it is lined up as Windows 7, Windows 8, Windows 98 & now Windows 10. So, Windows 9 could have created confusion among older versions.
If you wish to try the preview of Windows 10 then you can download the ISO from the direct link given below:
Click Here To Download The ISO of Windows 10 Preview
I have directly provided the download link else you need to login, register and then you will be able to download the Windows 10 ISO. Microsoft also provides a 4 MB exe installer which can be downloaded by clicking on Get the upgrade button. Yesterday, I was working on something and along side downloaded the Windows 10 twice.
In hurry, I clicked on Get the upgrade button thinking it as the Upgrade Advisor because Microsoft used to provide the same and then I ran it. It did not give any prompts or message and started downloading the latest version in silent mode and when I started my Windows Computer this morning then Windows Update panel was asking me to Upgrade to Windows Technical Preview as shown below:
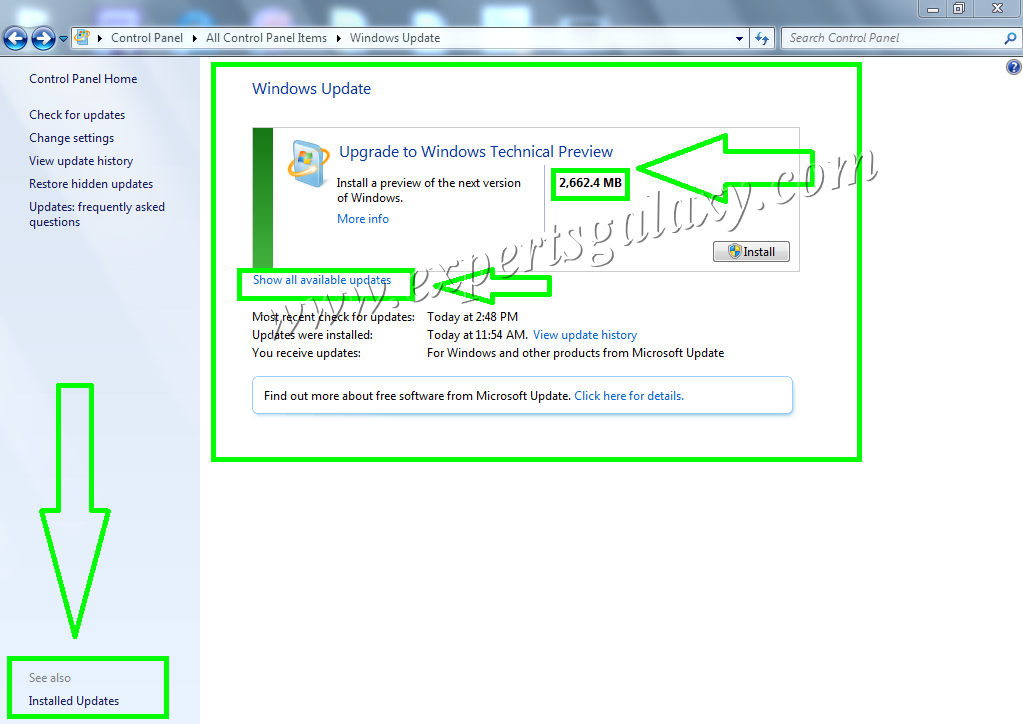
I never wanted to download and install the Technical Preview this way replacing my Windows 7 on the machine, so I thought of cancelling this update but could not convert the thought to reality for some time. When you click on "Show all available updates" link as shown in the image above, it does not give any option to cancel or uninstall the upgrade. At the most, it gives you an option to copy the details or hide the update as shown below:

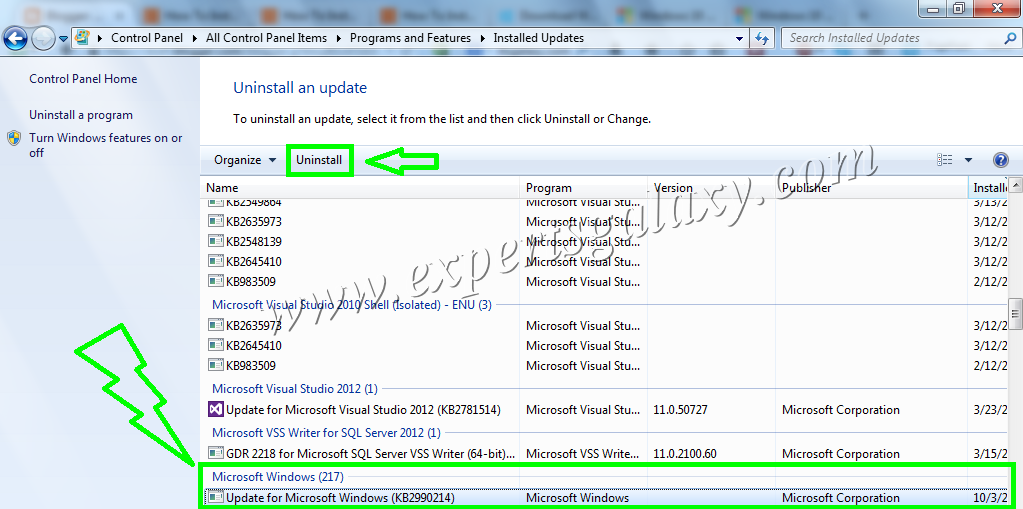
To completely cancel this update to avoid upgrading your existing Windows Operating System, you need to click on install updates as shown on the first image. It will take you to the installed updates section of Program & Features and then you need to search for KB2990214. Highlight the update so that the uninstall option will appear on the screen and then click on it as shown below:
It will take some time and then it asks you to restart the computer. It took around 1 hour for me before I could login again and then I installed the Windows 10 technical preview in a virtual environment. The latest installation of Windows 10 was the most hectic installation of Windows till now as it started the installation in a way which I never intended. Anyhow moving forward, once you download the ISO from the above link then you can follow the Step-by-Step procedure to install Windows as explained below. You may also visit the link mentioned below to login & then register to download the ISO file:
Visit the link here to register & download Windows 10
If anyhow you encounter the WindowsTechnicalPreview.exe file while browsing the web pages of Windows 10 then I advice you to skip that to avoid the problem which I faced as mentioned above. Once you have the ISO file, you can use a virtual environment to test the latest version of Windows and let us see the step by step procedure to install it.
1) Boot your computer using the DVD ISO of Windows 10 and it will come up with the loading screen as shown below. I wonder why have they kept the loading screen similar to the loading screen of Windows 8 though it was different for all previous versions of Windows. I hope they change it to a better one in the final release of the version to avoid any confusion between the loading screen of 8 & 10.

2) Once the ISO is up you will see the setup screen, simply choose the desired options for Language, Time & Keyboard Input before clicking next as shown below:

3) On the next screen, please click on install now as its our first install. You might need to click on Repair your computer if you will ever face issues while using Windows 10:

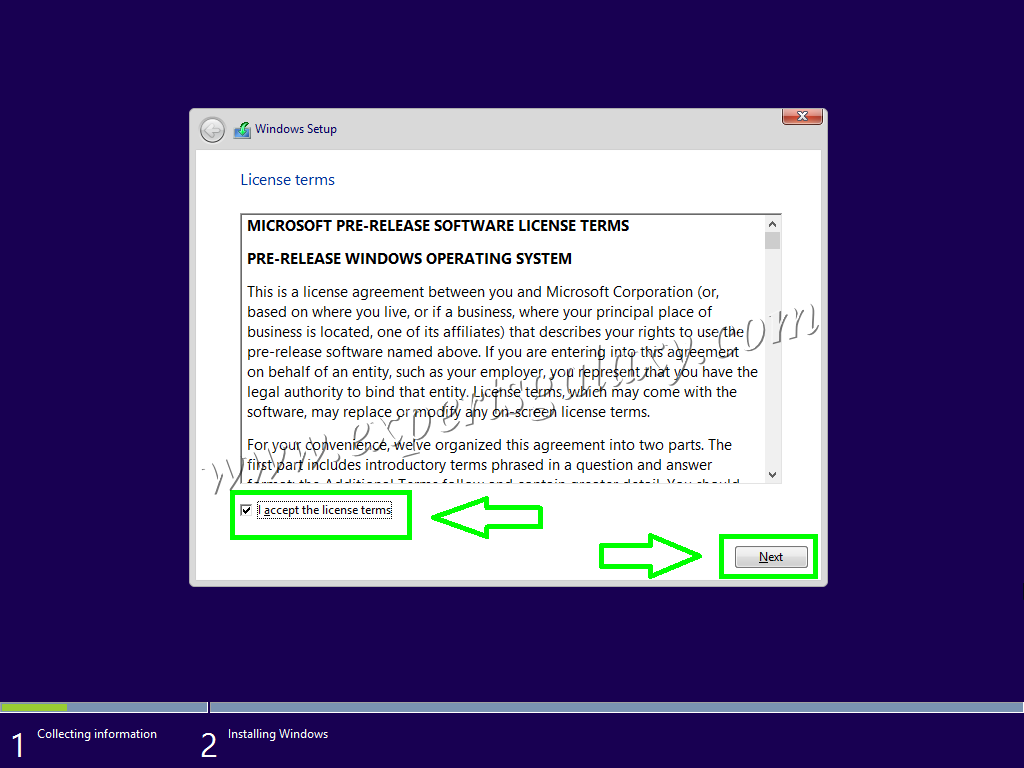
4) On the next screen, please accept the license terms for the pre-release software and then click on next:
5) Now you need to select the type of installation that you wish to do. If you are upgrading an existing installation of Windows say the version 8.1 then choose upgrade else select Custom Installation to multiboot your computer.

6) On the next screen, it will show you the list of partitions to install Windows. It could list a single partition or multiple partitions depending upon your partitioning scheme. You need to make sure that the selected partition should not contain any data or existing installation of Windows which you want to keep. So select an empty partition and click on next:

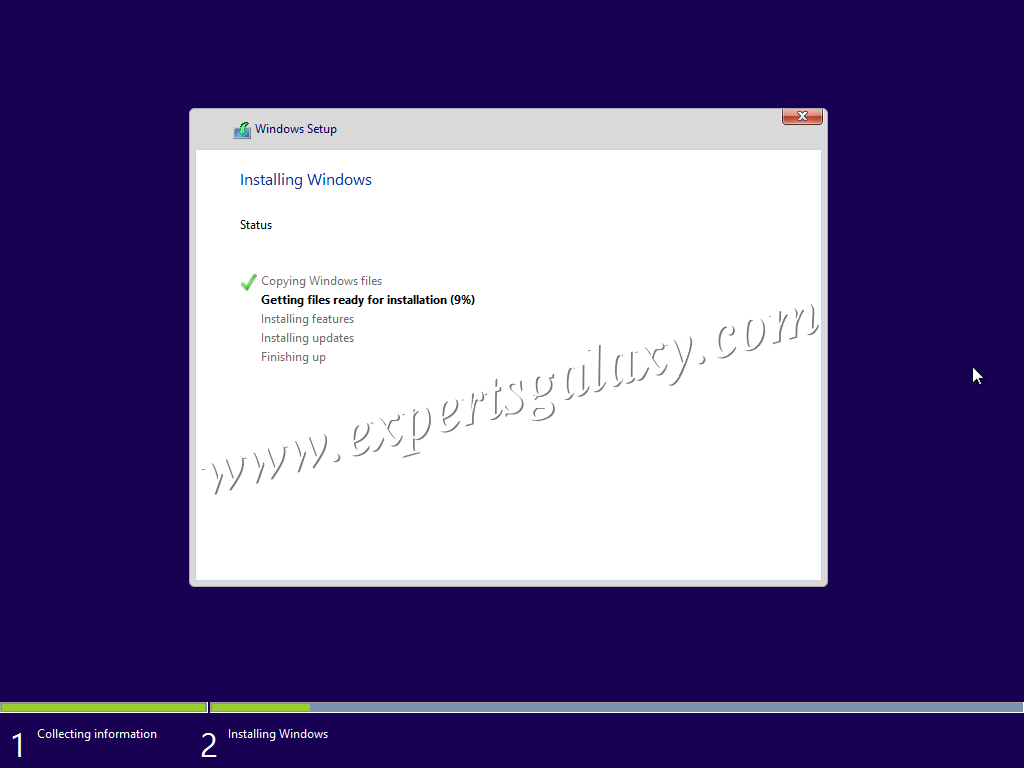
7) It might give you a warning to create additional partitions for system files, please click on Ok. From Windows 7 onwards, it creates a separate partition for system files known as System Reserved Partition and then you will see the Installing Windows screen as shown below:
8) Once the installation of features and updates will be done then it restarts the computer:

9) It will start preparing your devices after the computer restarts:

10) Then you will see a purple screen with multiple options, please click settings to proceed further:

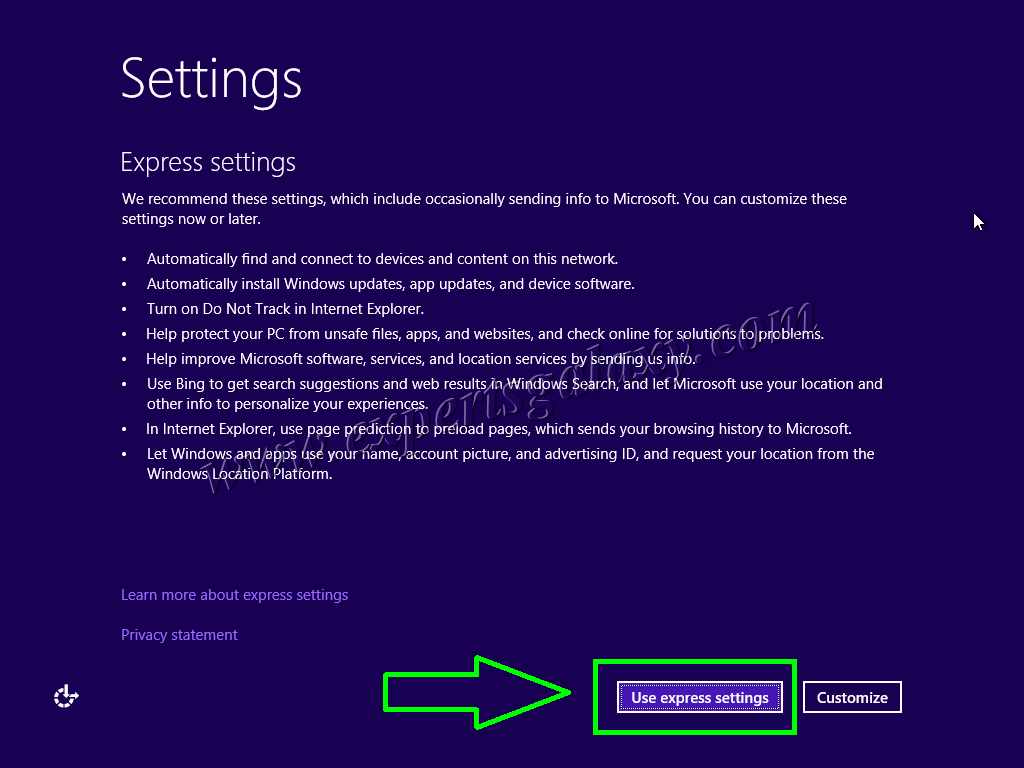
11) You can customize the settings or may use express settings as shown below:
12) Next you will setup your account so it checks for an internet connection. If it finds one then it will ask you to sign in to your Microsoft account or you may disconnect the internet to create a local account. I did sign in using an MS account:

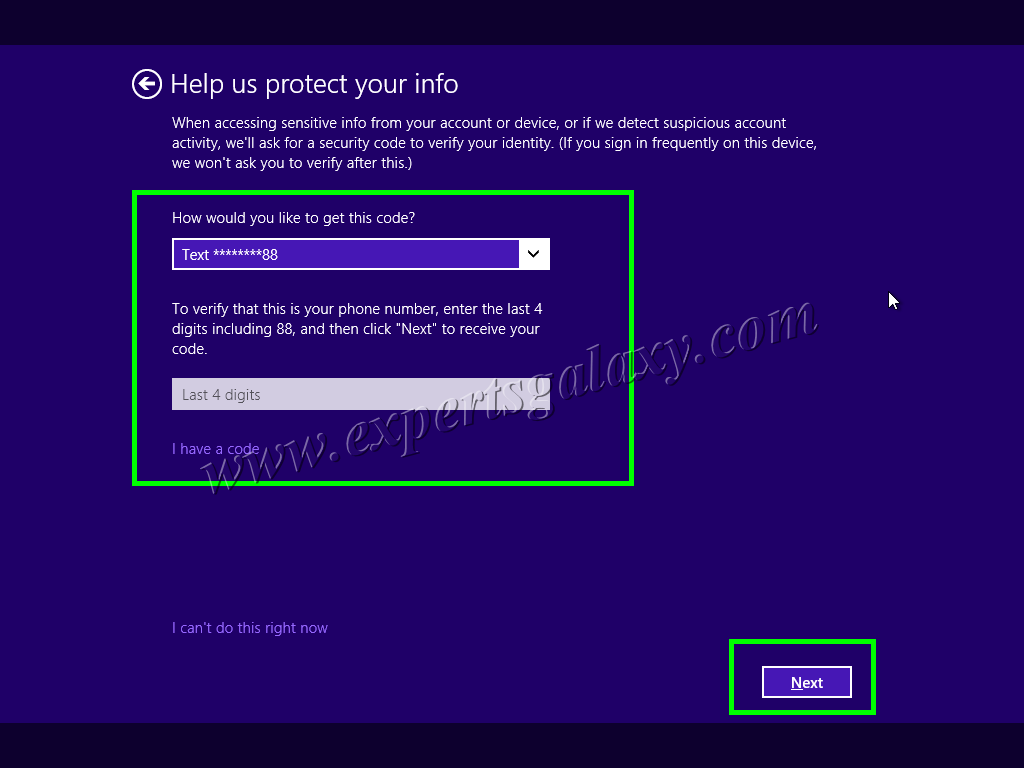
13) It may ask you to verify your Microsoft account depending upon the security setup in your account as shown below:
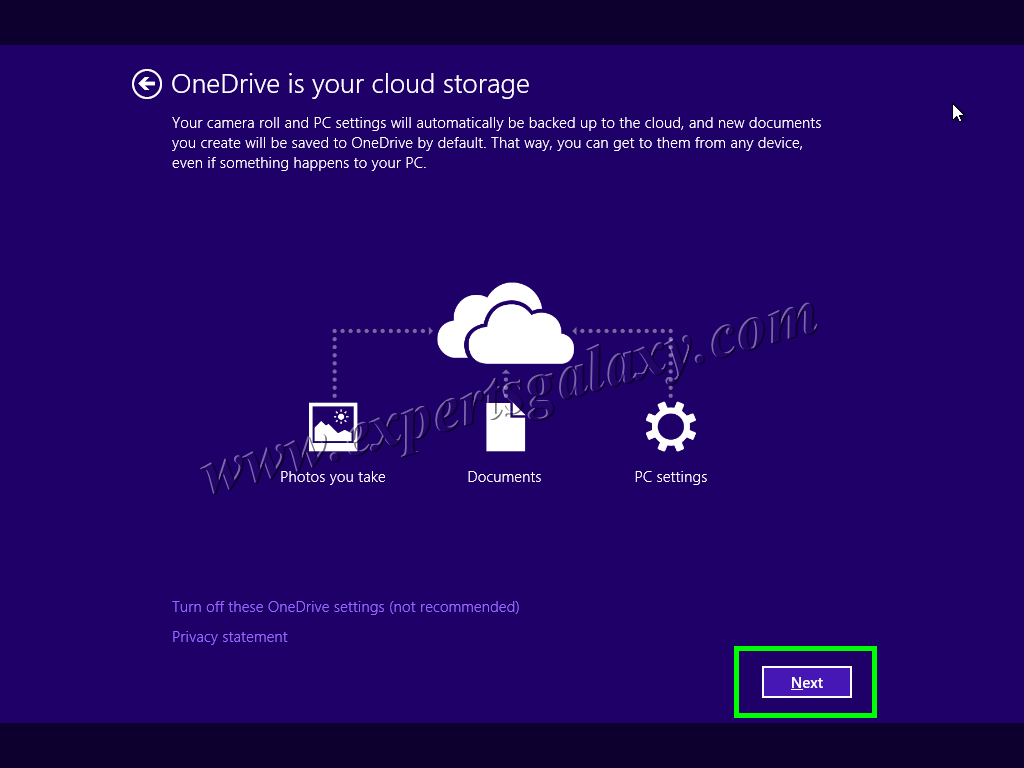
14) On the next screen, you may turn off your OneDrive settings but it is not recommended by Microsoft. It is quite useful as the technology is moving towards Cloud Computing so let it be untouched to save your data and access it anytime even if something happens to the computer.
15) It will then finalize the settings:

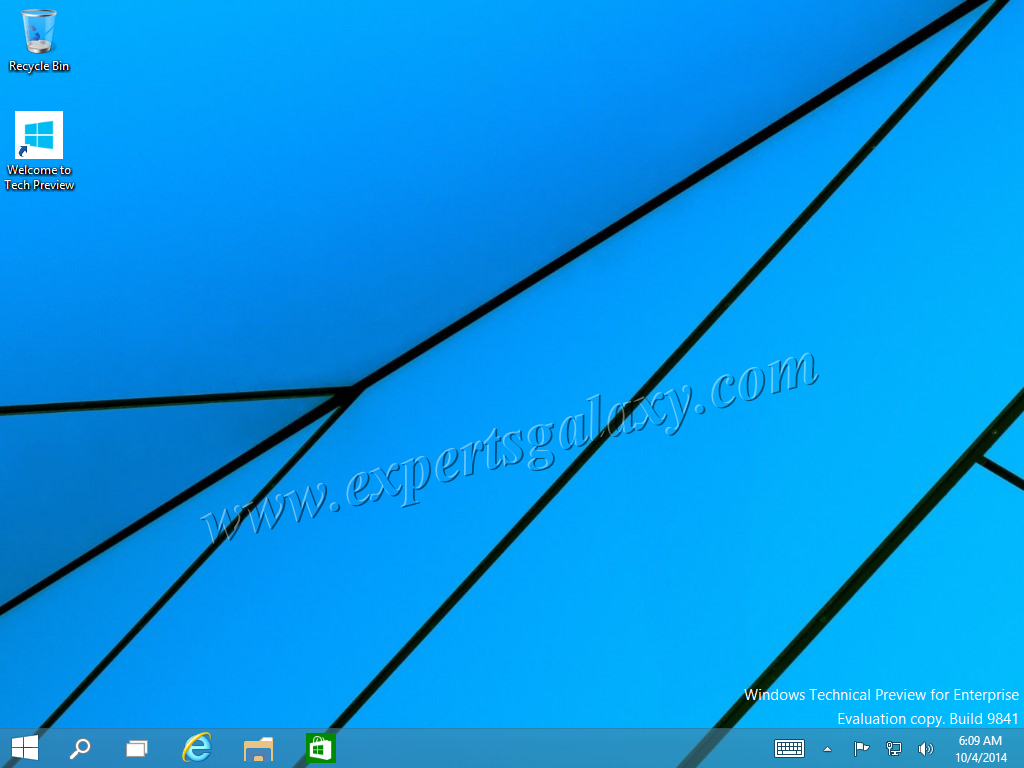
16) You might be happy to see that the Start Screen is not included anymore in Windows 10 and we are back to the normal desktop with everyone's favorite Start button.
17) Windows 8 was heavily criticized for the missing start button as people were used to operate their Windows using the button. Now, Microsoft has included the start button again in Windows 10 as shown below:

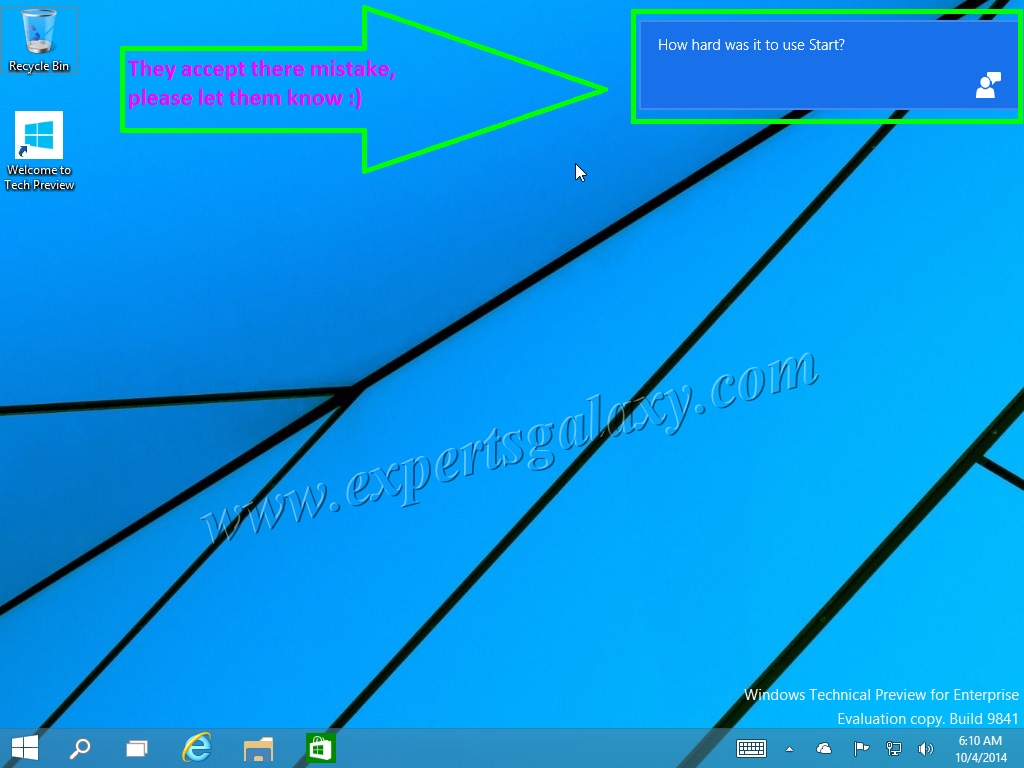
18) Microsoft accepts its fault of removing the start button from Windows 8. When you press the Windows button on your keyboard to launch the start screen then it asks for your feedback to tell them how hard was it to use Start? Lol, it was a coincidence for me.
They should have retained the start screen appearance, only upon pressing the start button on the keyboard. Might be few people including me liked the feature but removing start button was surely a deadly mistake. I also could not understand even if they included it back then what was the need to reposition the shutdown option at the top.

The installation of Windows 10 is similar to the installation of Windows 8 and it seems if one is installing the final version of the previous OS only. I wonder what GUI improvements will they do in the final version as I don't see much changes apart from the reappearance of start button. As of now I only see Windows 10 as a new version to bring the start button back in a user's life but with a pathetic relocation of shut down & restart options. I hope they have increased the security features to greater extent with some improved internal working of Windows.
At a glance, one can not tell if he is working on Windows 8.1 or Windows 10 unlike previous versions where one can distinguish among different versions of Windows. What do you think about this latest preview of Windows? Do let us know if you like this technical preview or not? What other changes should be there in the final version? What other improvement would you like to see in the final version of Windows 10?
Microsoft has already ended the support for its most loved Operating System which was Windows XP and there was a need for another Windows as Vista was not appreciated that much neither Windows 8. It was the perfect time for them to announce a new version and they launched Windows 10. Rumors were there that it would be Windows 9 but because of a technical glitch or internal issues they named their new product as Windows 10 instead of Windows 9 to avoid the confusion of 9X era.
No one knows the reality of naming it as version 10 but the logic can be understood a bit. If you will give a glance to the categories section on this blog then you might notice that it is lined up as Windows 7, Windows 8, Windows 98 & now Windows 10. So, Windows 9 could have created confusion among older versions.
If you wish to try the preview of Windows 10 then you can download the ISO from the direct link given below:
Click Here To Download The ISO of Windows 10 Preview
I have directly provided the download link else you need to login, register and then you will be able to download the Windows 10 ISO. Microsoft also provides a 4 MB exe installer which can be downloaded by clicking on Get the upgrade button. Yesterday, I was working on something and along side downloaded the Windows 10 twice.
In hurry, I clicked on Get the upgrade button thinking it as the Upgrade Advisor because Microsoft used to provide the same and then I ran it. It did not give any prompts or message and started downloading the latest version in silent mode and when I started my Windows Computer this morning then Windows Update panel was asking me to Upgrade to Windows Technical Preview as shown below:
I never wanted to download and install the Technical Preview this way replacing my Windows 7 on the machine, so I thought of cancelling this update but could not convert the thought to reality for some time. When you click on "Show all available updates" link as shown in the image above, it does not give any option to cancel or uninstall the upgrade. At the most, it gives you an option to copy the details or hide the update as shown below:
To completely cancel this update to avoid upgrading your existing Windows Operating System, you need to click on install updates as shown on the first image. It will take you to the installed updates section of Program & Features and then you need to search for KB2990214. Highlight the update so that the uninstall option will appear on the screen and then click on it as shown below:
It will take some time and then it asks you to restart the computer. It took around 1 hour for me before I could login again and then I installed the Windows 10 technical preview in a virtual environment. The latest installation of Windows 10 was the most hectic installation of Windows till now as it started the installation in a way which I never intended. Anyhow moving forward, once you download the ISO from the above link then you can follow the Step-by-Step procedure to install Windows as explained below. You may also visit the link mentioned below to login & then register to download the ISO file:
Visit the link here to register & download Windows 10
If anyhow you encounter the WindowsTechnicalPreview.exe file while browsing the web pages of Windows 10 then I advice you to skip that to avoid the problem which I faced as mentioned above. Once you have the ISO file, you can use a virtual environment to test the latest version of Windows and let us see the step by step procedure to install it.
1) Boot your computer using the DVD ISO of Windows 10 and it will come up with the loading screen as shown below. I wonder why have they kept the loading screen similar to the loading screen of Windows 8 though it was different for all previous versions of Windows. I hope they change it to a better one in the final release of the version to avoid any confusion between the loading screen of 8 & 10.
2) Once the ISO is up you will see the setup screen, simply choose the desired options for Language, Time & Keyboard Input before clicking next as shown below:
3) On the next screen, please click on install now as its our first install. You might need to click on Repair your computer if you will ever face issues while using Windows 10:
4) On the next screen, please accept the license terms for the pre-release software and then click on next:
5) Now you need to select the type of installation that you wish to do. If you are upgrading an existing installation of Windows say the version 8.1 then choose upgrade else select Custom Installation to multiboot your computer.
6) On the next screen, it will show you the list of partitions to install Windows. It could list a single partition or multiple partitions depending upon your partitioning scheme. You need to make sure that the selected partition should not contain any data or existing installation of Windows which you want to keep. So select an empty partition and click on next:
7) It might give you a warning to create additional partitions for system files, please click on Ok. From Windows 7 onwards, it creates a separate partition for system files known as System Reserved Partition and then you will see the Installing Windows screen as shown below:
8) Once the installation of features and updates will be done then it restarts the computer:
9) It will start preparing your devices after the computer restarts:
10) Then you will see a purple screen with multiple options, please click settings to proceed further:
11) You can customize the settings or may use express settings as shown below:
12) Next you will setup your account so it checks for an internet connection. If it finds one then it will ask you to sign in to your Microsoft account or you may disconnect the internet to create a local account. I did sign in using an MS account:
13) It may ask you to verify your Microsoft account depending upon the security setup in your account as shown below:
14) On the next screen, you may turn off your OneDrive settings but it is not recommended by Microsoft. It is quite useful as the technology is moving towards Cloud Computing so let it be untouched to save your data and access it anytime even if something happens to the computer.
15) It will then finalize the settings:
16) You might be happy to see that the Start Screen is not included anymore in Windows 10 and we are back to the normal desktop with everyone's favorite Start button.
17) Windows 8 was heavily criticized for the missing start button as people were used to operate their Windows using the button. Now, Microsoft has included the start button again in Windows 10 as shown below:
18) Microsoft accepts its fault of removing the start button from Windows 8. When you press the Windows button on your keyboard to launch the start screen then it asks for your feedback to tell them how hard was it to use Start? Lol, it was a coincidence for me.
They should have retained the start screen appearance, only upon pressing the start button on the keyboard. Might be few people including me liked the feature but removing start button was surely a deadly mistake. I also could not understand even if they included it back then what was the need to reposition the shutdown option at the top.
The installation of Windows 10 is similar to the installation of Windows 8 and it seems if one is installing the final version of the previous OS only. I wonder what GUI improvements will they do in the final version as I don't see much changes apart from the reappearance of start button. As of now I only see Windows 10 as a new version to bring the start button back in a user's life but with a pathetic relocation of shut down & restart options. I hope they have increased the security features to greater extent with some improved internal working of Windows.
At a glance, one can not tell if he is working on Windows 8.1 or Windows 10 unlike previous versions where one can distinguish among different versions of Windows. What do you think about this latest preview of Windows? Do let us know if you like this technical preview or not? What other changes should be there in the final version? What other improvement would you like to see in the final version of Windows 10?
Like this article Or Missed any license giveaway as read it late? Subscribe to my Blog via Email so that you wont miss a single post or future giveaways


