
If you have been in touch with us via our official Facebook page then you must have noticed my Virtual Android Screen and now I got the time to finally write a detailed tutorial for you. At times for such long installation tutorials, I plan to switch to Video Blogging to save more time. Don't get surprised if anytime, you get a post where you will get to know about a new version launch of Experts Galaxy in video mode.
Anyhow lets get back to the installation of Android OS as a virtual machine in your Linux or PC. If you are regular here then by now, you should be familiar with the procedure of installing an Operating System in a virtual environment using VirtualBox. Now, I am sharing the procedure to install a Virtual OS using VMware product with an example installation of Android.
Download the free VMware Player software using the link below:
Click Here to See the Complete Download List of VMware Products
Install the software as we install any software in our OS be it Windows or your favorite Linux distro. Now we need to install the Android OS but for that we need an ISO image for the same. Please download the latest or your desired Android installation from the link provided below:
Click Here to Download the Android 4.4 ISO
Or
Click Here to Download different versions of Android ISO
I will be using Android 4.4 RC 2 for this tutorial and now lets begin with it.
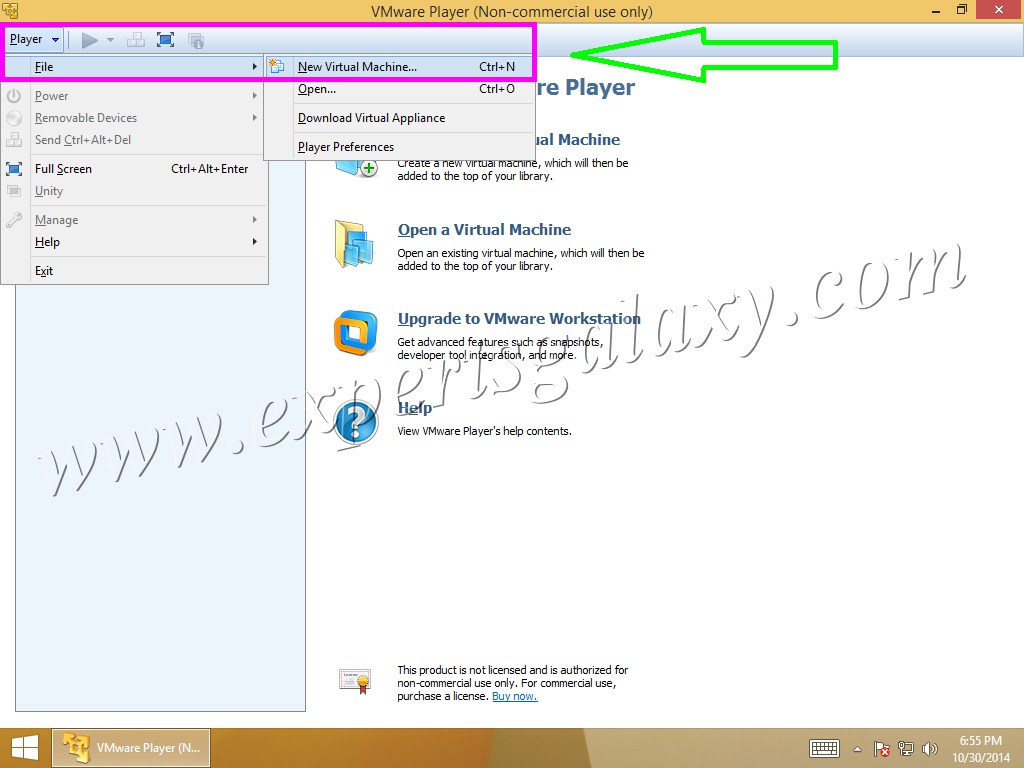
1) After installing VMware Player, please click on Player>> File>> New Virtual Machine as shown below:
2) New Virtual Machine Wizard screen will be there, simply browse the downloaded ISO and click next.

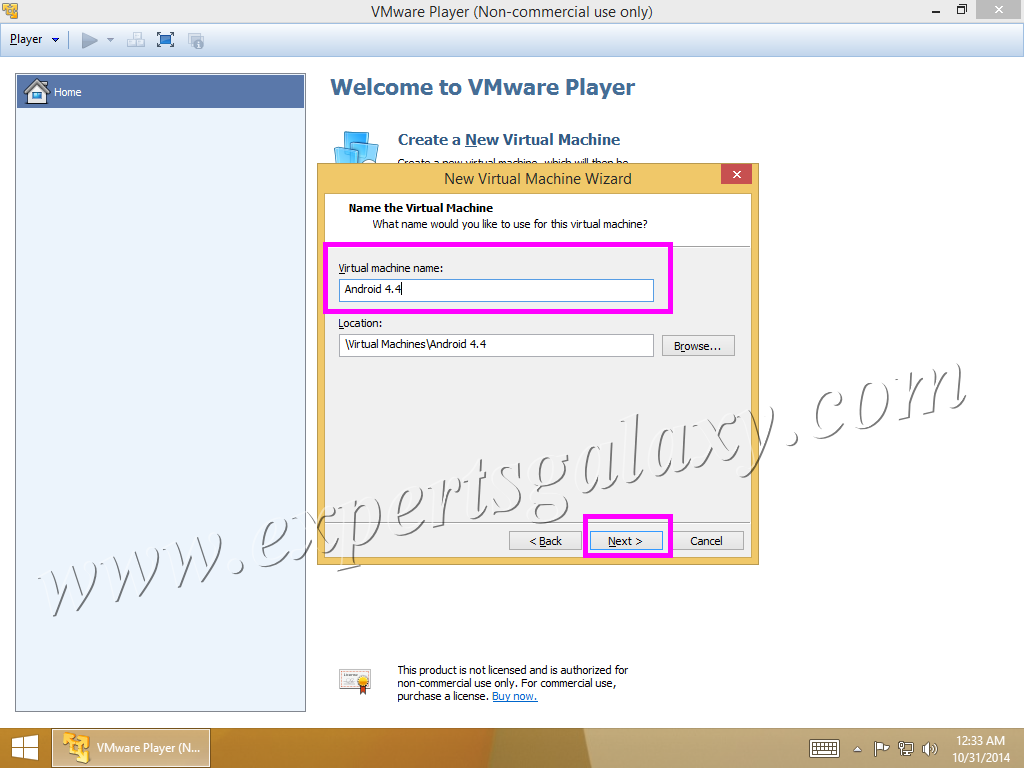
3) Now name your new virtual machine and it can be anything. After that click on next
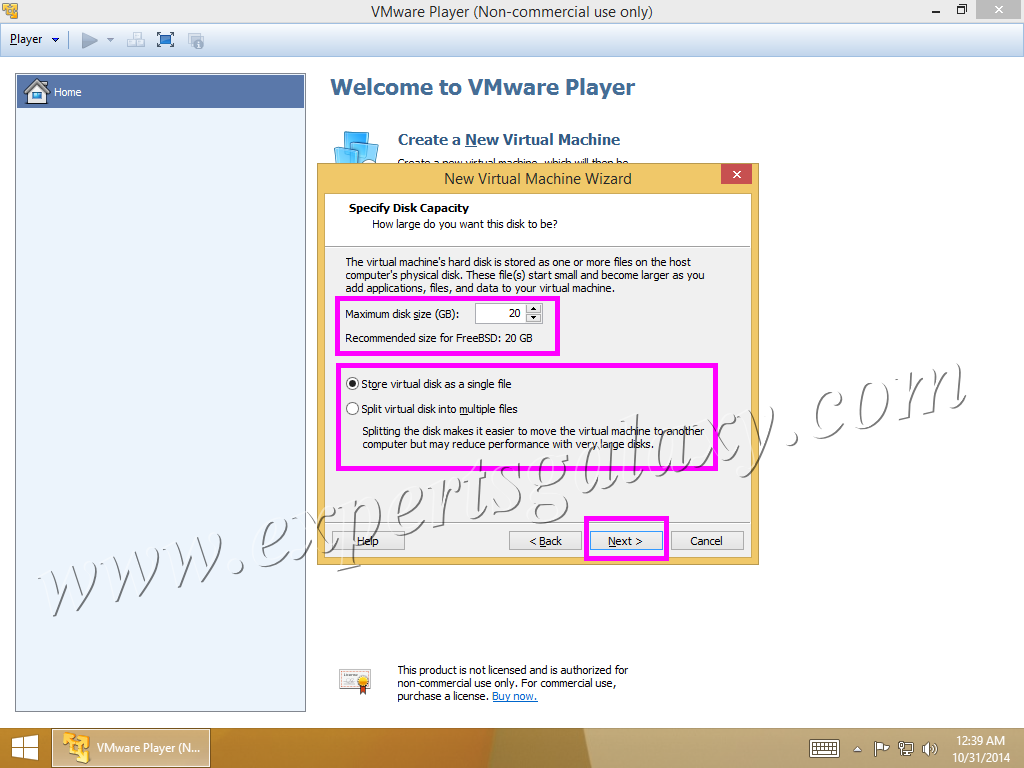
4) Specify the disk capacity of your new virtual machine. I use the first option for better performance and you can also change the size of the disk while installing any other virtual OS.
5) On the next screen, you can customize the hardware for your virtual machine like increasing the memory or changing the type of Network Adapter.

6) Once you click on finish then the virtual machine will start with the Android's boot screen. Select the install Android to hard disk option and press enter.

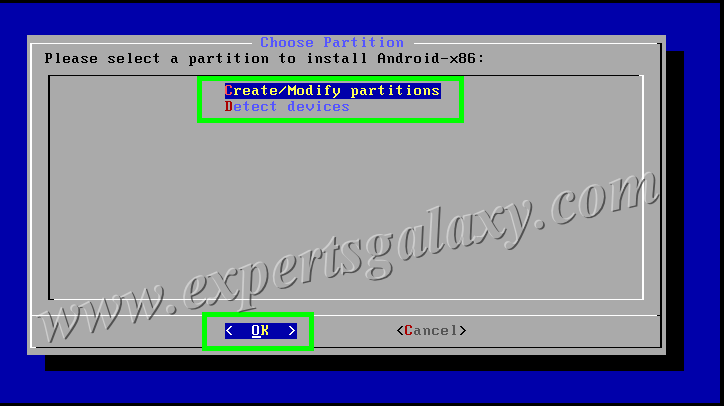
7) You will see, please select a partition screen and let it be as shown below.
8) On the next screen, please select the new option using the arrow keys on the keyboard as we need to partition our virtual hard disk and press enter.

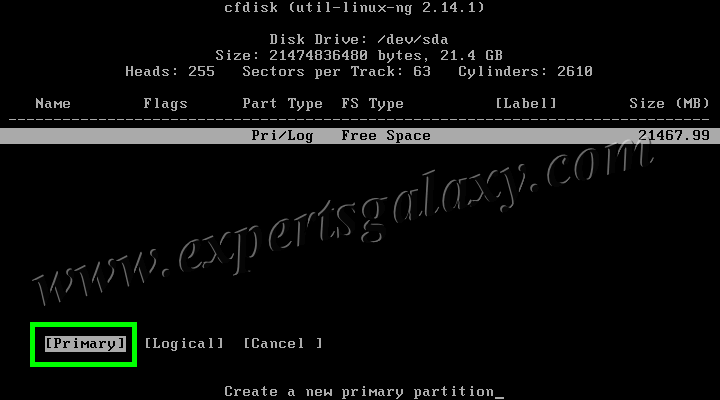
9) Now we need to decide if we wish to make a primary or logical partition. I will use primary partitioning scheme in this tutorial, treating it as an MBR disk. Do remember that a hard disk with MBR type of partitioning can have either "4 primary partitions" or "3 primary and one extended partition". You may search for MBR vs GPT partitioning scheme in Google to know more.
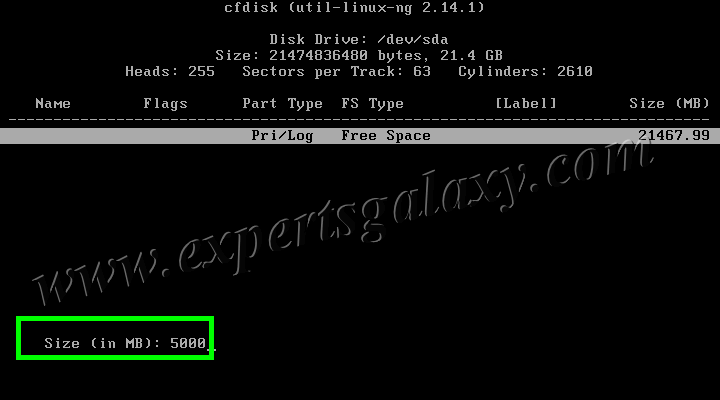
10) Please specify the new partition size, simply start typing the numbers to specify the size without using backspace or delete key to delete the size displayed on the screen
11) It will ask you for the partition location, please select the beginning of the disk

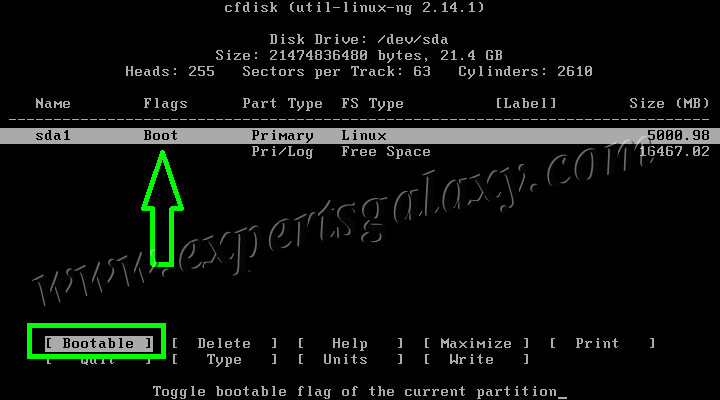
12) On the next screen, you will see the created partition. It will already be selected along with the bootable option at the bottom. Simply press enter to mark the partition as bootable.
13) Now, please select the free space and then repeat the procedure (Don't mark other partitions as bootable)New>> Primary>> Beginning>> Free Space>> Until you create 4 primary partitions this way though one bootable partition is enough to install it. Android is a Linux based OS however here its installation is different than a normal Linux Installation.

14) Once all the partitions are created then please select the write option and press enter. It will ask you to confirm it by typing yes, so please follow the instructions.

15) Once you see the message "Wrote partition table on the disk", you may select the print option to check it and then select the quit option to come back to installation screen.

16) Once you will be back on the blue screen then please select a partition to install Android. Let it be sda1 as we made it the boot partition.

17) Please select a filesystem for sda1. Let it be ext3 as its a file system for Linux, the way we have NTFS for Windows.

18) Select yes on the next screen as we are sure that we need to format the selected partition.

19) It will ask you if you wish to install GRUB or not which is a bootloader for Linux. Please select yes.

20) Please select yes as it says making /system be read-write is easier for debugging. Select no if you know what are you doing.

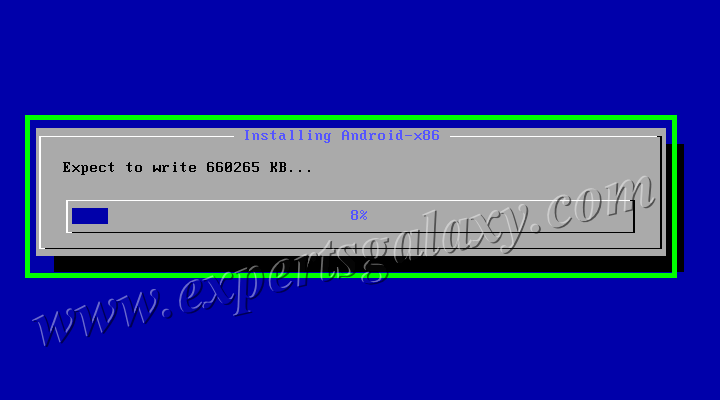
21) It will start installing Android OS as desired.
22) Congratulations, your Android installation is complete. You should reboot your virtual machine to configure your new Android which you have installed as Virtual Machine.

23) Here is the Android screen after installation.

24) Select a language for configuration

25) If it detects your net connection then well and good, else skip it.

26) I hope, you have switched to Gmail by now
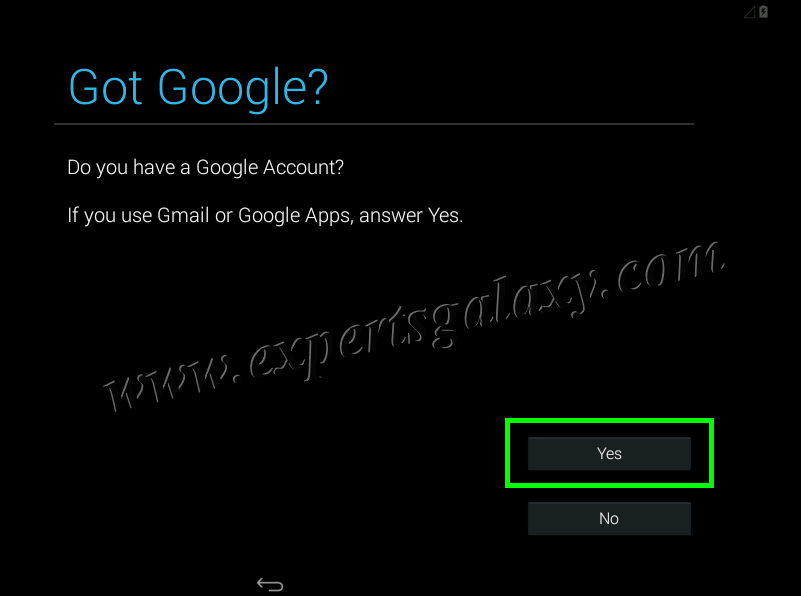
27) Use your Google credentials to sign in

28) Do some basic configuration and then give a name to your virtual tablet

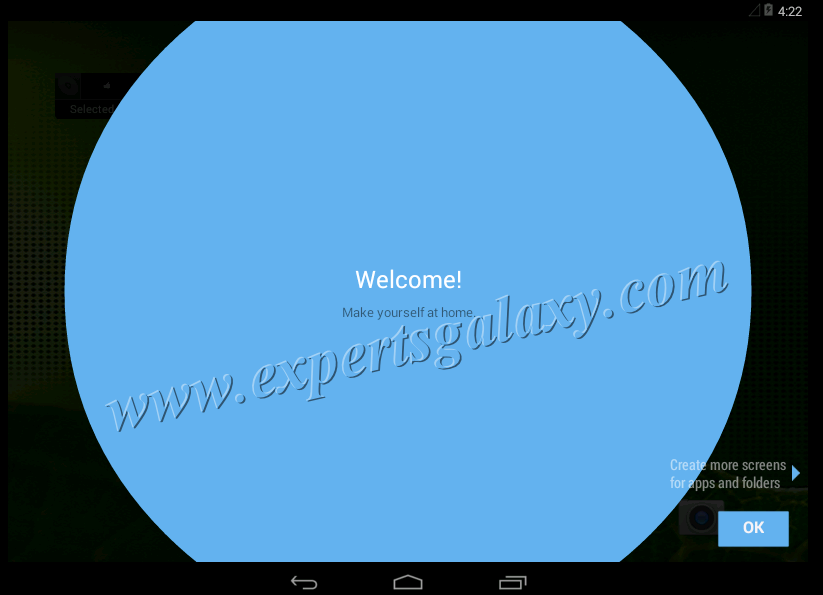
29) Next you see the welcome message
30) Finally, you configured the new Android installation as well

Now you can use and test the Android installation here. In this long post, you learnt to install a Virtual Operating System in VMware Player which is a free software for non-commercial use. You could have used any other virtualization software to install Android as guest OS. If you need to install Linux or Windows as virtual machine then we have all the tutorials for the installation, just browser the respective categories at the right hand side.
Let me share my setup for this post. I have used a Linux machine with VirtualBox, then a Windows 8.1 Enterprise version installed in VirtualBox. In Windows 8.1, I installed the free version of VMware Player 6.0 and then installed Android in it. This is the power of Virtualization and there are many companies competing for the top position, VMware being the leader for now. I hope you enjoyed the installation of your new Virtual Machine.
Anyhow lets get back to the installation of Android OS as a virtual machine in your Linux or PC. If you are regular here then by now, you should be familiar with the procedure of installing an Operating System in a virtual environment using VirtualBox. Now, I am sharing the procedure to install a Virtual OS using VMware product with an example installation of Android.
Download the free VMware Player software using the link below:
Click Here to See the Complete Download List of VMware Products
Install the software as we install any software in our OS be it Windows or your favorite Linux distro. Now we need to install the Android OS but for that we need an ISO image for the same. Please download the latest or your desired Android installation from the link provided below:
Click Here to Download the Android 4.4 ISO
Or
Click Here to Download different versions of Android ISO
I will be using Android 4.4 RC 2 for this tutorial and now lets begin with it.
1) After installing VMware Player, please click on Player>> File>> New Virtual Machine as shown below:
2) New Virtual Machine Wizard screen will be there, simply browse the downloaded ISO and click next.
3) Now name your new virtual machine and it can be anything. After that click on next
4) Specify the disk capacity of your new virtual machine. I use the first option for better performance and you can also change the size of the disk while installing any other virtual OS.
5) On the next screen, you can customize the hardware for your virtual machine like increasing the memory or changing the type of Network Adapter.
6) Once you click on finish then the virtual machine will start with the Android's boot screen. Select the install Android to hard disk option and press enter.
7) You will see, please select a partition screen and let it be as shown below.
8) On the next screen, please select the new option using the arrow keys on the keyboard as we need to partition our virtual hard disk and press enter.
9) Now we need to decide if we wish to make a primary or logical partition. I will use primary partitioning scheme in this tutorial, treating it as an MBR disk. Do remember that a hard disk with MBR type of partitioning can have either "4 primary partitions" or "3 primary and one extended partition". You may search for MBR vs GPT partitioning scheme in Google to know more.
10) Please specify the new partition size, simply start typing the numbers to specify the size without using backspace or delete key to delete the size displayed on the screen
11) It will ask you for the partition location, please select the beginning of the disk
12) On the next screen, you will see the created partition. It will already be selected along with the bootable option at the bottom. Simply press enter to mark the partition as bootable.
13) Now, please select the free space and then repeat the procedure (Don't mark other partitions as bootable)New>> Primary>> Beginning>> Free Space>> Until you create 4 primary partitions this way though one bootable partition is enough to install it. Android is a Linux based OS however here its installation is different than a normal Linux Installation.
14) Once all the partitions are created then please select the write option and press enter. It will ask you to confirm it by typing yes, so please follow the instructions.
15) Once you see the message "Wrote partition table on the disk", you may select the print option to check it and then select the quit option to come back to installation screen.
16) Once you will be back on the blue screen then please select a partition to install Android. Let it be sda1 as we made it the boot partition.
17) Please select a filesystem for sda1. Let it be ext3 as its a file system for Linux, the way we have NTFS for Windows.
18) Select yes on the next screen as we are sure that we need to format the selected partition.
19) It will ask you if you wish to install GRUB or not which is a bootloader for Linux. Please select yes.
20) Please select yes as it says making /system be read-write is easier for debugging. Select no if you know what are you doing.
21) It will start installing Android OS as desired.
22) Congratulations, your Android installation is complete. You should reboot your virtual machine to configure your new Android which you have installed as Virtual Machine.
23) Here is the Android screen after installation.
24) Select a language for configuration
25) If it detects your net connection then well and good, else skip it.
26) I hope, you have switched to Gmail by now
27) Use your Google credentials to sign in
28) Do some basic configuration and then give a name to your virtual tablet
29) Next you see the welcome message
30) Finally, you configured the new Android installation as well
Now you can use and test the Android installation here. In this long post, you learnt to install a Virtual Operating System in VMware Player which is a free software for non-commercial use. You could have used any other virtualization software to install Android as guest OS. If you need to install Linux or Windows as virtual machine then we have all the tutorials for the installation, just browser the respective categories at the right hand side.
Let me share my setup for this post. I have used a Linux machine with VirtualBox, then a Windows 8.1 Enterprise version installed in VirtualBox. In Windows 8.1, I installed the free version of VMware Player 6.0 and then installed Android in it. This is the power of Virtualization and there are many companies competing for the top position, VMware being the leader for now. I hope you enjoyed the installation of your new Virtual Machine.
Like this article Or Missed any license giveaway as read it late? Subscribe to my Blog via Email so that you wont miss a single post or future giveaways


