
Linux has its own world and people are moving gradually to it even though they are not aware about the same. Android is a Linux based OS and it is one of the most used Operating System for mobiles. I have been playing with Linux for quite long, used to do a bit or two things and then planned to complete my Redhat Certification, which I did last year.
Redhat does not provide Linux for free and hence one needs a powerful Operating System based on Linux kernel. Yes, Linux is just a kernel on which different OS are designed and you can read the full story here. Anyhow lets talk about a OS known as Debian Linux. Though there are many Linux distros that I use and try like Debian, CentOS, Fedora and RHEL, but there are two that I love to explore more and more. The Redhat family and Debian family.
Recently, Debian released the new version 8, known as Jessie and lets see how we can install the same. I am using Debian 8 Live ISO with GNOME Desktop, which can be downloaded here. If you are new to Linux and would like to try it in a virtual environment then I have written the tutorial for VirtualBox & VMware Player so that you can test any OS in your computer without disturbing the host installation.
1) Boot using the Live DVD of Debian as shown below. You can also test Debian without installing it using the Live option, though we will begin with the Graphical Install.

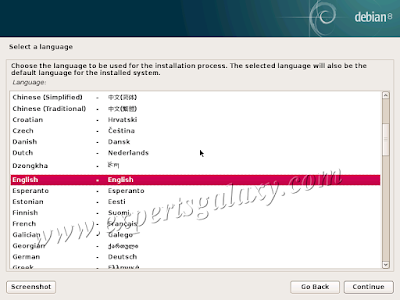
2) Select a Language
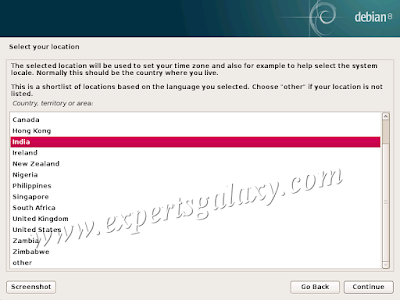
3) Select your location
4) Configure your keyboard layout

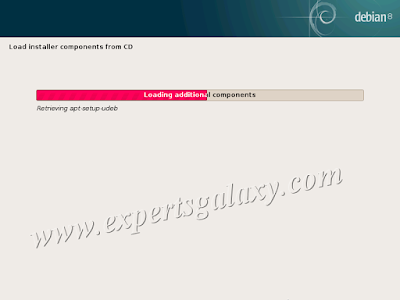
5) It will start loading components, followed by network detection and configuration.
6) Setup your hostname, make sure it doesn't contain any spaces.

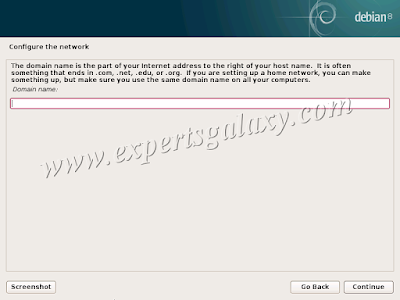
7) On the next screen please type your domain (if you are setting one) or leave it blank/localdomain if you are not aware of any domain.
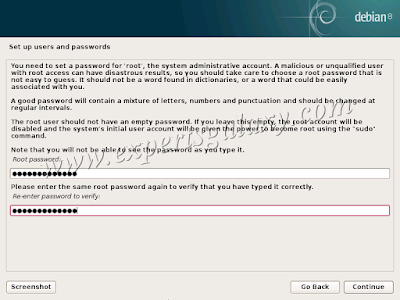
8) Now, as in Windows we have administrator account to manage the things, the same way we have root account in Linux which is the admin account. Please select a root password to manage things in your Linux Installation.
9) Its not recommended to use root account when its not required. It is good to setup another user for non-administrative uses so please type the real name for your new user.

10) Now type a username for the user

11) Please select a password for the user so that you can use the credentials for non-admin uses.

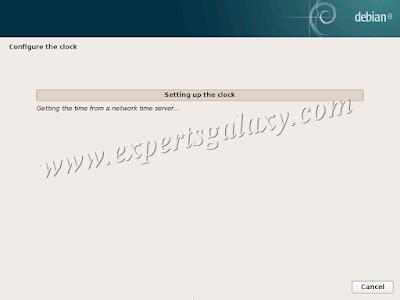
12) After that it will configure the clock from a Network Time Server as shown below:
13) Here comes the partitioning part as shown below, where we need to tell the installer that how we would like to use our hard disk. You can use either of the guided options or manual, I will select the manual option. If you are wondering what is LVM and encrypted partitions then you may refer my Facebook page where I share useful Linux Learning Links.
If you are new to this blog then let me share that I am a Redhat Certified Engineer and if everything goes smoothly then would be a Redhat Certified Architect by the end of Next year. Its just the availability of time as we don't have many good institutes in my city.

14) Partitioning disk is quite confusing in Debian if we go the manual way. I remember that I struggled a lot for manual partitioning in Debian Wheezy. Let me make it simple for you in Jessie, we are installing Debian Linux 8 here whose codename is Jessie. Even if we selected the manual partition then also it gives many more option however it should only ask us about the disk that we would like to use for manual partitioning.
I am using VMware for this post so lets select the disk.
15) Then it asks you if you would like to create a partitioning table or not. We do want, so please select yes and then click continue

16) Please select the partition as shown below and then click on continue so that we can configure it for our installation

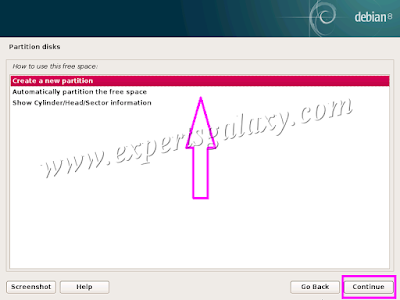
17) Once again you can select the automatic mode but lets do it the manual way
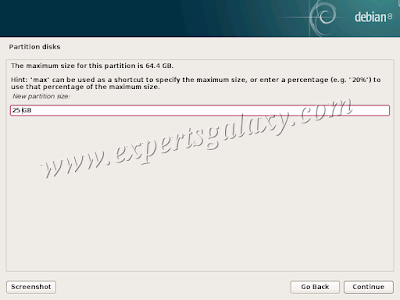
18) Now we need to specify the size of a partition here, we will create four partitions (/, boot, swap & home). "/" is the root partition, /boot is the boot partition where those files reside which are necessary for booting. SWAP is similar to Virtual Memory in Windows and /home is where we have the home directories for users. Lets give 25 GB for / where all our software installation will go in a specified directory.
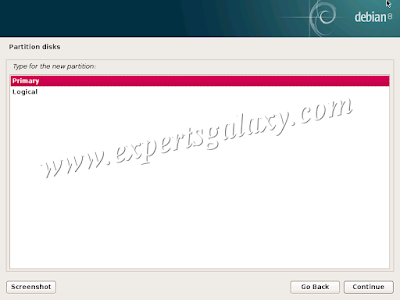
19) Please select a type for the partition that we created in above step. Lets make it primary as we will experiment logical and LVM things later on
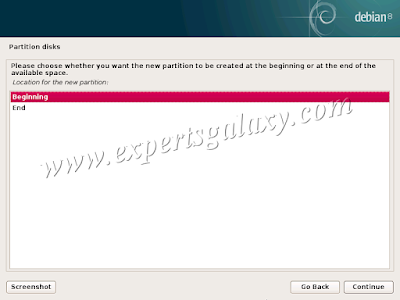
20) Now we need to select a location for the new partition, lets be it at the beginning

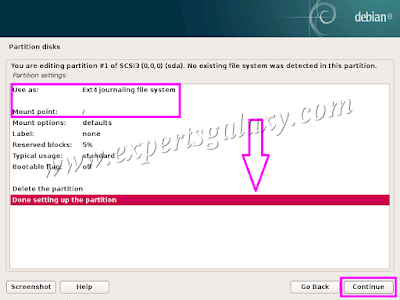
21) You will see the details of the new partition, if you wish you can change the things like file system, mount point etc. For us, its good to go so we would select "Done setting up the partition"
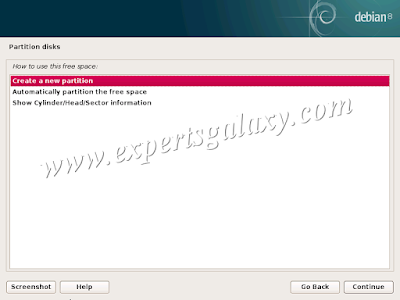
22) It will take us to the partition overview screen, please select the free space to configure the other partitions required for our installation

23) Once again select the create new partition option for our /home partition

24) Please specify the size of your /home partition, I have specified 15 GB though you can specify anything as per your need. To learn Linux in a virtualized environment, these specified sizes are enough.

25) We need to specify the type of our home partition. It could be logical as well and it highlights the same option by default.

24) Let the location of our home partition be in the beginning as well. It will be at the end of the / partition
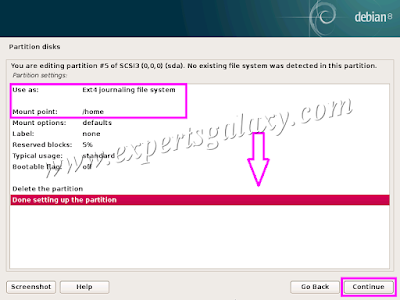
25) It will show the home partition settings
26) Once again select the free space to configure the other partitions

27) Select create new for /boot partition

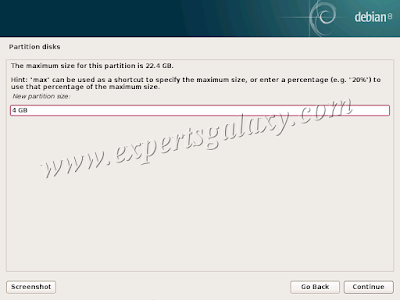
28) Please specify 2 GB size for it which is more than enough

29) On the next screen, it will show the boot partition type as logical by default as the installer is creating the partition for /usr directory. We need to change the partition to primary as we will change the mount point later from /usr to /boot

30) Location would be in the beginning by default so don't change it.

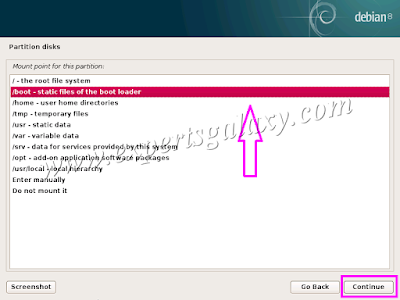
31) On the settings screen, please double click the mount point option to change it from /usr to /boot
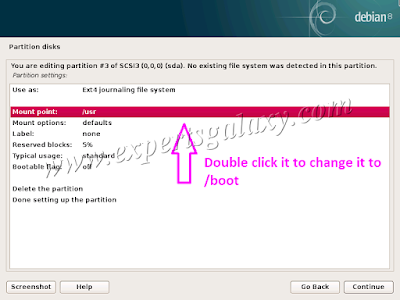
32) On the next screen, change the mount point to /boot
33) Now the mount point has changed to /boot as desired, please click on done settings as shown below

34) Please select free partition on mount points overview screen

35) Specify the SWAP space size which is the last partition configuration for this installation
36) Please specify a size of 4 GB for a memory of 2 GB
37) Its time to select the location for the Swap, let it be the default one

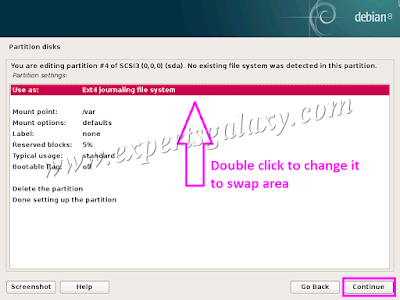
38) On the next screen, please double click the use as option to change it to swap area
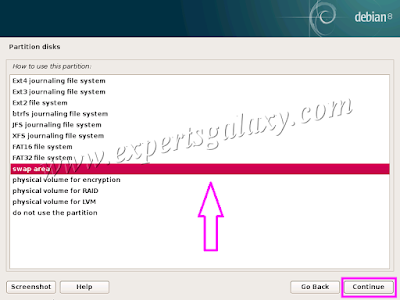
39) Please select swap area as shown below
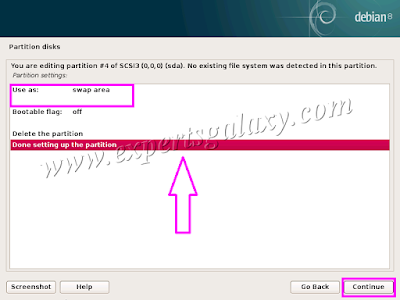
40) Please click on done settings once you see swap area in the use as option
41) Review the created partitions and then click on finish partitioning. Just make sure that you alott the space in such a way that you should not see any unusable space as shown below.

42) You can skip the home partition creation as we did in above step and simply create 3 primary partitions as shown below. The free space can be used later on for creating home or any other partition. Once you would be familiar with LVM then you will prefer it over normal partitions followed by encrypted partitions.

43) It will ask you to finalize the changes on the disk

44) Once you click on continue then it will start installing Debian Linux on your system.

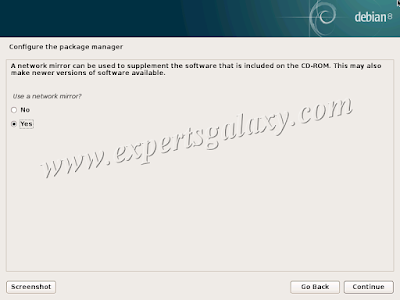
45) You can configure the package manager as per your internet connection's speed
46) Please select a archive mirror country

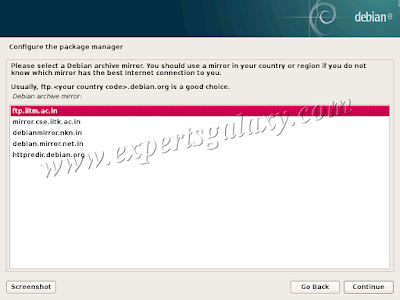
47) Now select a mirror archive
48) Leave it blank if you are not using any proxy

49) It will start configuring apt which is the package manager for Debian

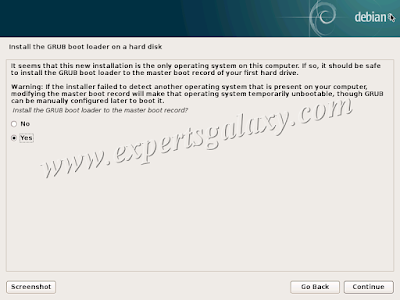
50) Please confirm the installation of GRUB
51) Select the desired drive for the installation of GRUB

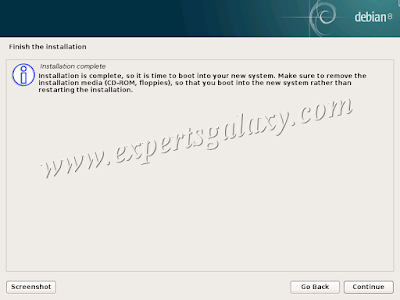
52) Congratulations as you see the installation complete screen, please click on continue
53) You would see the finishing installation screen upon clicking continue

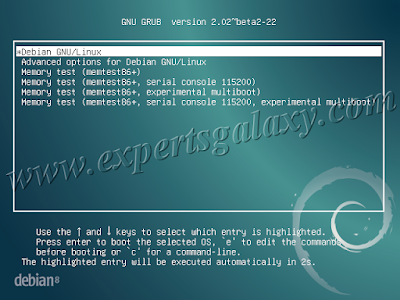
54) After that you would see the Debian boot screen
55) Here is the login screen. You can login using the non-admin user that we created in one of the above steps.

56) Debian does not allow the login using the root account, just in case you want to login as root though its not recommended then press Ctrl+ Alt + F1 keys combination. You will see a black screen which is a terminal screen where you can login using the root credentials (You won't be able to see the password, simply type it and press enter). Once logged in then you can use the startx command to switch to the GUI using root credentials.

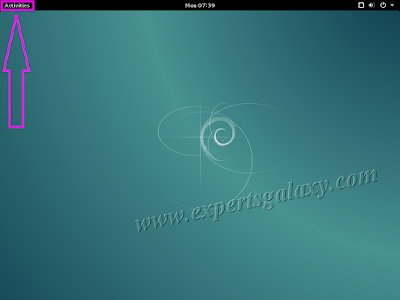
Now you would see your desktop and you can click on activities to explore more. I don't like this desktop and prefer the previous one, which was there in Debian Wheezy so I might switch back to it.
Welcome to the world of Linux and now you can explore it as per your wish. If you would like to learn more about the OS then you can visit Linux Learning Links page here where I have shared almost all the topics of RHCSA & RHCE. You can also refer the Redhat Installation & Fedora Installation, if you would like to explore more distros, mind it all are free apart from RHEL (Red hat Enterprise Linux).
Redhat does not provide Linux for free and hence one needs a powerful Operating System based on Linux kernel. Yes, Linux is just a kernel on which different OS are designed and you can read the full story here. Anyhow lets talk about a OS known as Debian Linux. Though there are many Linux distros that I use and try like Debian, CentOS, Fedora and RHEL, but there are two that I love to explore more and more. The Redhat family and Debian family.
Recently, Debian released the new version 8, known as Jessie and lets see how we can install the same. I am using Debian 8 Live ISO with GNOME Desktop, which can be downloaded here. If you are new to Linux and would like to try it in a virtual environment then I have written the tutorial for VirtualBox & VMware Player so that you can test any OS in your computer without disturbing the host installation.
1) Boot using the Live DVD of Debian as shown below. You can also test Debian without installing it using the Live option, though we will begin with the Graphical Install.

2) Select a Language

3) Select your location

4) Configure your keyboard layout

5) It will start loading components, followed by network detection and configuration.

6) Setup your hostname, make sure it doesn't contain any spaces.

7) On the next screen please type your domain (if you are setting one) or leave it blank/localdomain if you are not aware of any domain.

8) Now, as in Windows we have administrator account to manage the things, the same way we have root account in Linux which is the admin account. Please select a root password to manage things in your Linux Installation.

9) Its not recommended to use root account when its not required. It is good to setup another user for non-administrative uses so please type the real name for your new user.

10) Now type a username for the user

11) Please select a password for the user so that you can use the credentials for non-admin uses.

12) After that it will configure the clock from a Network Time Server as shown below:

13) Here comes the partitioning part as shown below, where we need to tell the installer that how we would like to use our hard disk. You can use either of the guided options or manual, I will select the manual option. If you are wondering what is LVM and encrypted partitions then you may refer my Facebook page where I share useful Linux Learning Links.
If you are new to this blog then let me share that I am a Redhat Certified Engineer and if everything goes smoothly then would be a Redhat Certified Architect by the end of Next year. Its just the availability of time as we don't have many good institutes in my city.

14) Partitioning disk is quite confusing in Debian if we go the manual way. I remember that I struggled a lot for manual partitioning in Debian Wheezy. Let me make it simple for you in Jessie, we are installing Debian Linux 8 here whose codename is Jessie. Even if we selected the manual partition then also it gives many more option however it should only ask us about the disk that we would like to use for manual partitioning.
I am using VMware for this post so lets select the disk.
15) Then it asks you if you would like to create a partitioning table or not. We do want, so please select yes and then click continue

16) Please select the partition as shown below and then click on continue so that we can configure it for our installation

17) Once again you can select the automatic mode but lets do it the manual way

18) Now we need to specify the size of a partition here, we will create four partitions (/, boot, swap & home). "/" is the root partition, /boot is the boot partition where those files reside which are necessary for booting. SWAP is similar to Virtual Memory in Windows and /home is where we have the home directories for users. Lets give 25 GB for / where all our software installation will go in a specified directory.

19) Please select a type for the partition that we created in above step. Lets make it primary as we will experiment logical and LVM things later on

20) Now we need to select a location for the new partition, lets be it at the beginning

21) You will see the details of the new partition, if you wish you can change the things like file system, mount point etc. For us, its good to go so we would select "Done setting up the partition"

22) It will take us to the partition overview screen, please select the free space to configure the other partitions required for our installation

23) Once again select the create new partition option for our /home partition

24) Please specify the size of your /home partition, I have specified 15 GB though you can specify anything as per your need. To learn Linux in a virtualized environment, these specified sizes are enough.

25) We need to specify the type of our home partition. It could be logical as well and it highlights the same option by default.

24) Let the location of our home partition be in the beginning as well. It will be at the end of the / partition

25) It will show the home partition settings

26) Once again select the free space to configure the other partitions

27) Select create new for /boot partition

28) Please specify 2 GB size for it which is more than enough

29) On the next screen, it will show the boot partition type as logical by default as the installer is creating the partition for /usr directory. We need to change the partition to primary as we will change the mount point later from /usr to /boot

30) Location would be in the beginning by default so don't change it.

31) On the settings screen, please double click the mount point option to change it from /usr to /boot

32) On the next screen, change the mount point to /boot

33) Now the mount point has changed to /boot as desired, please click on done settings as shown below

34) Please select free partition on mount points overview screen

35) Specify the SWAP space size which is the last partition configuration for this installation

36) Please specify a size of 4 GB for a memory of 2 GB

37) Its time to select the location for the Swap, let it be the default one

38) On the next screen, please double click the use as option to change it to swap area

39) Please select swap area as shown below

40) Please click on done settings once you see swap area in the use as option

41) Review the created partitions and then click on finish partitioning. Just make sure that you alott the space in such a way that you should not see any unusable space as shown below.

42) You can skip the home partition creation as we did in above step and simply create 3 primary partitions as shown below. The free space can be used later on for creating home or any other partition. Once you would be familiar with LVM then you will prefer it over normal partitions followed by encrypted partitions.

43) It will ask you to finalize the changes on the disk

44) Once you click on continue then it will start installing Debian Linux on your system.

45) You can configure the package manager as per your internet connection's speed

46) Please select a archive mirror country

47) Now select a mirror archive

48) Leave it blank if you are not using any proxy

49) It will start configuring apt which is the package manager for Debian

50) Please confirm the installation of GRUB

51) Select the desired drive for the installation of GRUB

52) Congratulations as you see the installation complete screen, please click on continue

53) You would see the finishing installation screen upon clicking continue

54) After that you would see the Debian boot screen

55) Here is the login screen. You can login using the non-admin user that we created in one of the above steps.

56) Debian does not allow the login using the root account, just in case you want to login as root though its not recommended then press Ctrl+ Alt + F1 keys combination. You will see a black screen which is a terminal screen where you can login using the root credentials (You won't be able to see the password, simply type it and press enter). Once logged in then you can use the startx command to switch to the GUI using root credentials.

Now you would see your desktop and you can click on activities to explore more. I don't like this desktop and prefer the previous one, which was there in Debian Wheezy so I might switch back to it.

Welcome to the world of Linux and now you can explore it as per your wish. If you would like to learn more about the OS then you can visit Linux Learning Links page here where I have shared almost all the topics of RHCSA & RHCE. You can also refer the Redhat Installation & Fedora Installation, if you would like to explore more distros, mind it all are free apart from RHEL (Red hat Enterprise Linux).
Like this article Or Missed any license giveaway as read it late? Subscribe to my Blog via Email so that you wont miss a single post or future giveaways


